• About
  • Webinars
  • Release History
  • Support
  • About
  • Webinars
  • Release History
  • Support

Introduction

2
  • What is Projectmates?
  • General FAQ

Getting Started

7
  • Logging In
  • General Navigation
  • My Work
  • My Projects
  • Project Requests
  • Project Dashboard
  • Project Information and Attributes

My Team/Chats

2
  • Project Users and Project Contacts
  • Team Discussions

Documents and Photos

2
  • Document Manager
  • Photo Albums

Task Management

3
  • Schedules
  • Meeting Minutes
  • Action Lists

Cost Management

7
  • Project Cost Tracking Overview
  • Budgets
  • Contracts
  • Purchase Orders
  • PCOs
  • Change Orders
  • Invoices

Bidding

2
  • Bid Management
  • Bids and Plan Room

Construction Management

8
  • RFI/Issue Tracker
  • Submittals
  • Daily Field Reports
  • Site Visit Field Reports
  • Asset Planning
  • Custom Apps
  • Projectmates Connector for Procore
  • Projectmates Connector for PlanGrid

Reporting

2
  • Reporting Dashboard
  • Ad Hoc Reporting

Role-Based Training

5
  • Projectmates for PMs/CMs/Owners’ Reps
  • Projectmates for Architects
  • Projectmates for Contractors
  • Projectmates for Owner Executive Team Members
  • Projectmates for Owner Finance / Accounting Team Members

Drawings Tool

1
  • Drawings Tool
  • All Categories
  • Categories
  • Task Management
View Categories

Schedules

File-download

What is the Schedule Feature? #

With Projectmates schedule tool, building task-based timelines for projects is easy. Group tasks, set predecessors, assign responsibilities, set reminders, and more. Everyone on your team will be able to access the project schedule(s) from anywhere on any device, making it easy when you’re in the office or on-the-go.

Viewing the Schedule #

A project’s schedule(s) can be accessed by navigating to the project through the My Projects page.

  1. Once inside of a project, the schedule tool can be found on the left-side menu by clicking Tasks > Schedules. From there, select the appropriate schedule type.

  1. Tasks will be ordered chronologically, with the task’s Description, % Complete, Start & Finish dates, Duration, and Predecessor relationships noted.

Importing a New Schedule #

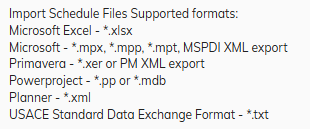
Projectmates allows users to import schedules formatted through our Excel template, or from an external system – such as Primavera (.xer) or Microsoft Projects (.mpp).

Importing from Project or Primavera #
  1. Within a schedule, selected from the left side bar menu: Click More in the top right-hand corner, and select Import/Export.

  1. From the schedule import/export menu:
    Click Select to open your computer’s file browser and locate your external schedule system file; or drag and drop the file into this screen.
Importing from Excel #
  1. Export the current schedule tasks into Projectmates template format.

  1. Or download the blank Projectmates format template.

a) Open the blank template in Excel.

b) The template allows you to fill in all necessary fields, with a sample task row provided.

  1. The columns marked in blue denote a required field, crucial for successful importing back into your Projectmates schedule.

4. Select the checkbox to confirm acknowledgment that “All existing items will be deleted on upload”. This ensures that a schedule isn’t duplicated by accident and will overwrite anything that previously existed.

5. Click Import.

Creating and Editing Tasks #

  1. Click + Task to create a new task for a schedule.

  1. In the “Create new task” window, enter a Task Name.
  2. Enter the Planned Start and Planned Finish dates.
  3. If applicable, enter the Actual Start and/or Actual Finish dates.
  4. Milestone tasks can be designated with the toggle option.
  5. Click Save once complete.

7. New tasks will automatically appear at the end of the schedule. To move a task to a new spot in the schedule, click the 6 dots on the left-hand side to drag and drop the task to a new location.

Adding a new task before/after an existing task #

Another way to add new tasks is to insert them directly before/after an existing task.

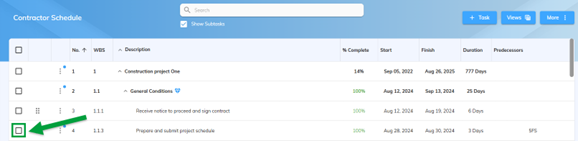
  1. Select the checkbox next to the existing task.

2. Use the arrow buttons to select Before or After.

3. Follow the previous steps to enter the new task details and Save.

Setting Up Predecessors #

Predecessor relationships can be set between tasks, allowing automated changes to tasks as the schedule is manipulated and actioned.

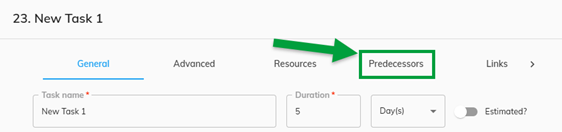
  1. Select a task to edit, and click the Predecessors tab.

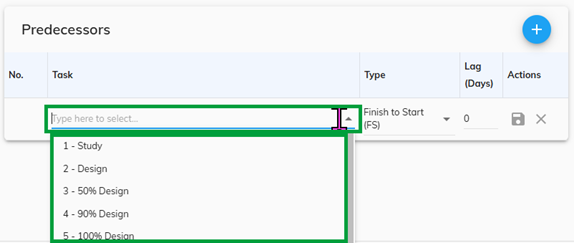
2. Click the + button.

3. Select a task from the dropdown that this task will be dependent on.

4. The dependency Type options are:
          1. Finish-Start (Task A finishes = Task B starts)
          2. Finish-Finish (Task A finishes = Task B finishes)
          3. Start-Finish (Task A starts = Task B finishes)
          4. Start-Start (Task A starts = Task B starts)

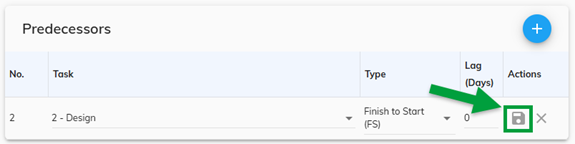
5. In the Lag (Days) field, denote any positive or negative lags days between the dependent task and the current task.

6. Click the Save icon under Actions.

Assigning Resources #

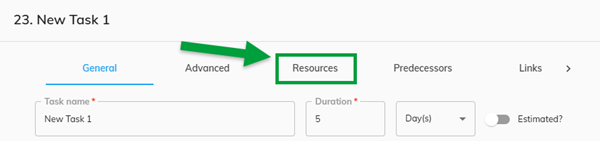
  1. Select a task to edit, and click the Resources tab.

2. Choose a specific User or Role to assign this task.

3. You have the option to Send Reminders and set the number of days before/after a task.

4. Click Save.

Gantt Chart View #

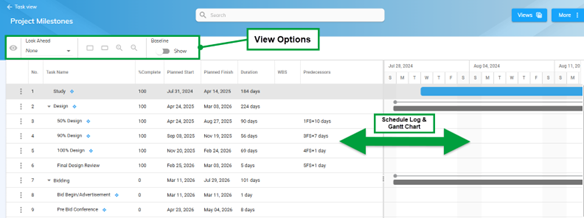
The schedule can be viewed with a Gantt chart for a more visual experience.
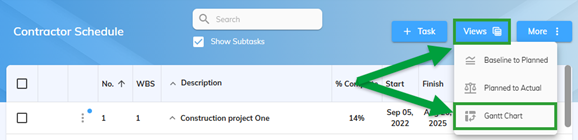
1. Click Views.
2. Select Gantt Chart.

3. Tasks will be ordered chronologically with a Gantt Chart panel on the right-hand side.

Task Management
Was this helpful?
Still stuck? How can we help?

How can we help?

Updated on February 20, 2025
Action ListsMeeting Minutes

Powered by BetterDocs

On this page
  • What is the Schedule Feature?
  • Viewing the Schedule
  • Importing a New Schedule
    • Importing from Project or Primavera
    • Importing from Excel
  • Creating and Editing Tasks
    • Adding a new task before/after an existing task
  • Setting Up Predecessors
  • Assigning Resources
  • Gantt Chart View
octave projectmates - w

Follow Us

© 2026 Octave Intelligence plc and/or its affiliates. All rights reserved.