
What is the Budget Feature? #
The Projectmates Budget tool is more than a spreadsheet to be maintained. It is a dynamic, collaborative, automated feature that provides live financial data throughout a project. Users can create standardized outlines for budgets based on project type and scope that can be linked to commitments to provide a live look ahead on project spending. Relevant team members can easily view early estimates side by side with total estimated costs all from one central location with no manual calculations required.
Budget Navigation #
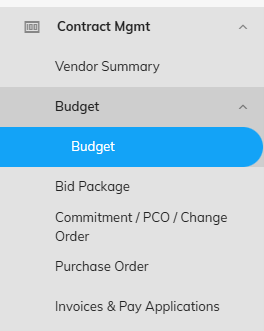
The Projectmates budget is located within the Cost Tracking section of the project. The budget can be accessed by:
- Opening up the project and clicking on the Contract Management tab.
- Select the option for Budget. If a project contains more than one budget you will need to click on the specific budget thread you want to open.
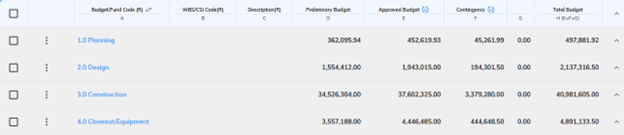
The budget data is organized into three levels.
Level One: Groups
These are high level roll ups of more granular data and can be identified as the bolded blue sections of the budget.
Level Two: Line Items
These are more specific rollups of project elements that make up a group. Line items are also displayed in blue, but are not bolded and reside below the group that they fall under.
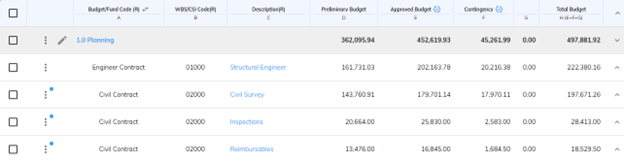
Level Three: Sub Items
This is where the dollar values come into play. To view Sub Items, click on the line item that they fall under.

The budget is composed of 5 tabs. Each tab will display different sets of budget data. The tabs are located to the left of the budget.

Budget: The budget tab will automatically load whenever you first open the budget and is composed of five columns designed to track what you plan to spend.
Note: The column header descriptions may be different to those indicated below depending on the client site.

Column D | Preliminary Budget: Provides a space for early budget estimates on a project. (Not factored into Total Budget calculation.)
Column E | Approved Budget: Provides a space to track formal budget numbers and will be factored into future budget calculations.
Column F | Contingency: Provides a space to track the movement of funds without directly changing the data in column E.
Column H | Total Budget: Sums up the dollar values from columns E and F for a total budget value.
Cost: The cost tab tracks what you agree to spend on a project in the form of contractual commitments. Once commitments are created and linked to the budget, most of the data in this section will populate automatically.

Column I | Total Commitments: Tracks the dollar value of the original commitments (contracts and purchase orders) associated with the budget subitem.
Column J | Approved COs: Houses the total value of all fully approved change orders for the section.
Column K | Total Cost: Summarizes the current total values from columns I and J to track the total approved amounts at present.
Column L | Pending COs: Houses the value of change orders that are still in the process of being approved. If fully approved that value will automatically transfer to column J. If rejected that value will not display in the budget.
Column M | Anticipated Cost: Summarizes columns K and L to provide a look ahead at how the budget could be impacted following the approval of pending items.
Column N | Cost Per SqFt: Utilizes the square footage of the project and the current anticipated cost to provide the current cost per square foot.
Variance: The Variance tab provides some new information based on the data outlined in the previous tabs.

Column O | Over / Under: Houses the difference between the total budget and the current total cost.
Column P | Anticipated Over / Under: Houses the difference between the total budget and the current anticipated cost.
Column S | Invoices and Pay Apps: Tracks the dollar value of the invoices that have been created against linked commitment thus far.
Actuals: The Actuals tab functions similarly to the variance. Not a lot of new data is displayed, but existing data is restructured to provide updates.

Column T | % S/M: Calculates what’s been invoiced and displays it as a percentage of the current anticipated cost.
Custom: The fifth tab is a custom tab composed of 6 available columns that clients can format as they wish. Some columns may pull from the previously outlined columns and some may need to be entered manually.
Adding Budget Items Through UI #
The Projectmates budget can be fully built out directly in the system. Though many projects have a starting template, below are the steps to build out or add to a budget.
Adding a new budget group and/or line item
- Open the budget and click on the + Line Item button in the upper right-hand corner.
- If creating a new group, type in the group name. If not, select the name of an existing group from the drop down
- Fill in columns C and D which are required fields.
- Click the Save icon.
Adding a new subitem
- Locate the line item that the sub item will fall under. (If a new line item is needed, follow the steps outlined above first).
- Click on the ellipses to the left of the line-item name
- Select the option + Sub-Line Item.
- Fill in the sub item name and section. Dollar values can also be added in at this point.

5. Click Save to commit your changes or Save and Add New to create another sub-item under that same line item.
Importing Budget Items From Excel #
- Open up the budget that you are looking to edit.
- Click on the More button located in the upper right-hand corner.
- Click Import/Export Data.
- The new window provides two options.
- Template: this is a blank excel template that allows you to start from scratch.
- Export: this will export out the current budget setup into the excel template.
The Excel template follows a vertical version of the budget hierarchy.
Column A: Group Detail
Columns B, C, and D: Line Item Details
Columns E, F, and G: Sub Item Details
Group and Line Item detail will repeat based on the number of subitems present.

- Fill in the blue required fields. Dollar values can also be added at this time to the right of the budget structure columns.
- Save your Excel sheet so that you can find it easily when you go to import.
- In the same window that you downloaded the template from, click on the blue Select button to grab your file.
- Click Import.
Important: Do not check the box to Delete existing data unless true. The budget import will merge to update existing data and create new data where needed. Deleting the existing data will break existing links between the budget and existing financials.

Creating Cost Tracking Items From the Budget #
As previously outlined, Projectmates cost tracking tools are designed to link back to the budget in order to provide live cost analysis throughout a project. Bid Packages, Contracts, Purchase Orders, and Invoices can all be created directly from the budget.
Though the scenarios for each will differ, the steps to creating from the budget will be the same.
- Open the budget and locate the items that you want to create an item for.
- Check the box next to the line item(s) that you want to include.
a) All subitems will be included initially, but you can unselect items to exclude them.
b)If an item is already linked to a cost tracking item, then it will not be available for you to select.

- At the top of the budget click on the option for Create… and select an option from the drop down.

- Give your item a name in the window that appears. Once named, click Go to proceed to the next step.

- At this point you will be working on the form associated with the module you selected.
Note: The item created may already contain dollar values if the corresponding section of the budget was filled in.
Ex: If dollar values already exist in column I and you are creating a contract or PO, then those dollar values will be included in the commitment, but can be edited on the items tab.
Budget Setup #
The majority of budget setup is preconfigured at the site level so that you can hit the ground running, but there are a couple of elements that can be set up at the project level for your budget: Cost Per Square Foot and Custom Columns.
Navigation
- Open up the budget that you are looking to setup.
- Click on Settings and Approvals located in the upper left-hand side, located above the Budget tab.

Budget Custom Columns
The custom columns are set up in 3 columns.
- Column Name
- Column Formula
- Formula Options
Any items displayed in bold have been configured at the site level and cannot be changed within the project.
Column Name and Formula can be typed manually.
Adding a formula will allow the field to auto populate based on the formula detail. This field can also be left blank in the setup area. This means fields must be entered manually or added via the excel import tool.
Column Formula can be populated two ways.
Option 1: Type the formula into the text box manually.
- Formulas should be entered in using { }

- Formulas can reference data from the preconfigured columns using a number between 1 and 10.
- Formulas can also reference other custom columns as long as the column precede the column referencing it.
- Ex: Column AC can reference the result of columns AA and AB, but cannot reference Columns AD, AE, and AF.
Option 2: Utilize the Select Formula Options drop down.
- Click on the drop down and select the column that you want to reference.
- If creating a formula, it will continue to pull data from the drop down.
- This will auto format to summarize the data points, but you can manually adjust the formula to subtract (-) or multiple (*) the values.

Cost Per Square Foot
The square footage of a project can be entered in on the same page as the custom columns at the bottom of the list.
The value entered here will automatically be referenced in column N for cost per sqft. This value is calculated by Anticipated Cost (M) / Cost Per Sq Ft (N)
Earned Value #
The Projectmates budget is not only linked to cost tracking items, but can also link to schedule tasks to monitor percent complete. Optionally, start and finish dates and percent completion can also be manually entered in budget sub items. All these tools working together allows the system to provide a comprehensive EVA tool to calculate cost against schedule.
To Access
- Open the budget that you want to review.
- Beneath the budget tabs on the left-hand side are four EVA views.

Earned Value Analysis Tabs #
EV Schedule Dates: The Schedule Dates tab displays key project timelines, including the Start and Finish Dates, Actual % Complete, and Planned Duration for each line item.
EV by Schedule: The EV by Schedule tab shows whether each work item is ahead or behind schedule, providing insights into project timeline performance.
EV by Invoice: The EV by Invoice tab tracks whether a line item is over or under the anticipated cost, helping to monitor financial performance against expectations.
EV Forecast: The EV Forecast tab calculates estimates based on both Budget and Schedule data to predict the total cost of the project if current progress continues at the same rate. These estimates provide an anticipated amount of money and time required to complete each work item. The To Complete Performance Index (TCPI) represents the ratio of work remaining to the remaining budget, indicating the level of efficiency the contractor must maintain from the current date to the project’s completion in order to stay within budget and on schedule.
Setup #
The EVA tool depends on five values to provide measurable results: Start Date, End Date, Actual % Complete, Anticipated Cost and Actuals. If any of these values are inaccurate, results will be skewed.
Option 1: Linking between Schedule and Earned Value Analysis
Connecting schedule tasks to budget subitems automatically updates the Start Date, End Date and Actual % Complete based on the linked schedule tasks. Multiple schedule tasks can be connected to single budget subitem.
Schedule links are established in the schedule tool.
To link Schedule tasks to a Budget sub-item:
- Go to the Schedule module and thread from which you want to link tasks to the budget.
- Mark the check boxes of one or more schedule task items to be linked to a single sub-item in the Budget.
- In the Actions drop-down, select the Link to Budget option.
The Link/Unlink Selected Tasks to Budget pop-up screen displays.
Option 2: Manually enter start and finish dates
All budget subitems have a field for Start and End dates and Actual Percent Complete.
- Open the subitem that you want to edit.
- Select the dates that you want to associate with the sub item.
Quick Tips on Earned Value Analysis
To access help specifically with Earned Value Analysis, click the More button at the top right corner of the workspace frame and then click EVA Definitions.

The Earned Value Analysis Columns Definitions pop-up displays the columns listed in the order in which they appear in Projectmates, including an explanation of the formula used in their calculations.
Cashflow Forecasting #
Projectmates’ Cashflow Forecast app uses a “cash-out” forecasting model that considers existing data (from manual input or from invoice data), making predictions of your future cost requirements more realistic and accurate.
Access
- Open the budget that you want to analyze.
- Click on the Cashflow Forecast option located beneath the budget and EVA tabs.
Projectmates calculates the cashflow forecast for each budget sub-item using its Anticipated Cost (column M), Actual Cost (column S), and start and finish dates.
Setup #
Date Range:
Forecasts are added up by line item and group and can display by month-, quarter-, semi-annual-, and year-long intervals.
- Click on the Change Date Range located at the top of the page.

Projectmates has 9 pre-configured cash flow views already set up or users can manually enter information to generate a custom cashflow. Both options are outlined below.
Option 1:
- Check the box next to the items you want to analyze.
- Click Cashflow Forecast at the top of the screen.
- Select from the pre-configured options.

Option 2:
- Hover over the subitem that you want to edit and click on the edit icon that appears.
- Manually enter in the dollar values for the current date range.
- Click Save.

Management #
The forecasting tool will hold onto the view that was setup until that view is edited. To maintain historical versions of a project’s forecast users will need to utilize the Saved Files tool.
To Save
- Click on the option for More in the upper right-hand corner.
- Select the option to Save to Files.
- Give the forecast a name and hit Save.

To Access
- Click on the option for More in the upper right-hand corner.
- Select the option for Saved Files.
- Click on the file name to download the saved view in Excel.

Quick Tips on Cashflow Forecast Types
To access help specifically about cashflow forecasting, click the More button at the top right corner of the workspace frame and then click About CF.

The About Cashflow Forecast pop-up explains how to use the app’s forecasting models, like Straight Line and S-Curve. This section outlines the calculations used in each forecast type, ensuring clarity on how anticipated costs, actual costs, and payment intervals are factored into the cashflow predictions. It also guides exporting, saving, and reviewing forecasts to stay on top of project finances.