With Projectmates checklist tool it’s never been easier to manage project requirements across all stages and across all teams. Projectmates checklists provide users with standardized and ad hoc checklists tools to monitor and punch a project. Tasks can be actioned or verified by project team members. Create standardized groupings, assign resources, and even link items to schedule tasks for automated due dates and completion dates. All these elements are available in the office or on the go using Projectmates mobile app.
Some checklists may be standardized and ready to go in new projects, while others, like Punchlists will need to be built out or added to. Here are instructions on how to create a new checklist task in Projectmates.
1. Locate the blue +Task button located in the upper right corner of the checklist.
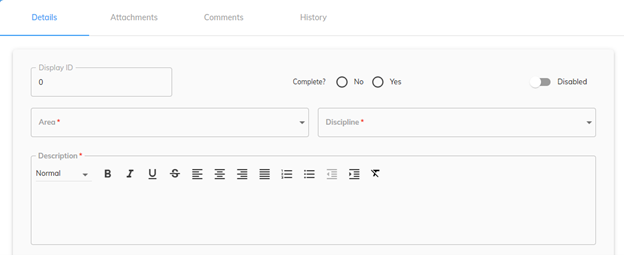
On the Details tab, fill in the required fields (red asterisk).
Choose an option from the pre-configured drop-downs for each group. Steps to add groups are outlined later in this document.
Add in your description. Smart text tools are available to format more complex descriptions.
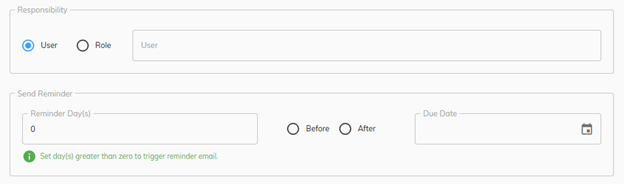
If needed, assign responsibility to a specific user or role, and the item will be placed in their court. Reminders can be set up either now or at any point after the task is created.
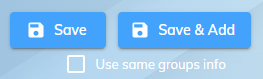
Once complete click the Save or Save and Add Task buttons located in the upper right-hand corner.
Clicking Save will create your task but keep you in that window to continue working on it.
Save and Add will save your current task and then open a new form to create another task. If you check the “Use same group info” box, the groups from the previous task will automatically be populated.
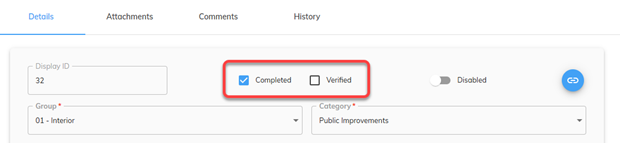
Checklists will be formatted in one of two ways when it comes to marking an item as complete. Some checklists will have a simple Yes | No workflow and others will follow a two-step Complete | Verify workflow. The steps for completing both types are outlined below.
Yes | No Workflows
1. Open the checklist and locate the Yes | No radio buttons located on the right-hand side of the page.
2. Hover over the yes or no options.
a. If you cannot interact with the radio button, your role is not responsible for managing these items.
b. If you can interact with the radio button, select either “Yes” or “No” as appropriate.
Once clicked, the system will automatically save that action.
Open the checklist and locate the Complete | Verify radio button located on the right-hand side of the page.
An item must be marked complete before it can be verified.
Hover over the complete | verify options.
a. If you can select the “Complete” radio button but not the “Verify” button, your role is responsible for marking items as complete.
b. If you can select the “Verify” radio button but not the “Complete” button, your role is to verify items that have been marked as complete by other project team members.
4. Once clicked the system will automatically save that action.
These actions can also be taken when a task is opened. The Yes | No and Complete | Verify options are in the top middle area of the task window. While in a task, make sure to click the Save button when selecting an option.
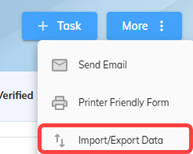
A checklist can be imported by going into the action list thread and clicking More > Import/Export Data in the top right-hand corner.
Users have two options when it comes to downloading the template. Both options are located on the top right of the screen. They have the same layout and required fields (highlighted in blue).
Option 1: Select the template option at the top of the pop up. This will provide you with a blank template to build out and import back into Projectmates.
Option 2: Select the export option. This will provide a filled-in version of the template based on items that already exist in this particular action list thread.
2. In the template/export file, complete the required fields highlighted in blue. Fields like “Responsibility”, or “Due Date” are not mandatory but can be filled in now or later in the system.
Note: When filling out the “Responsibility” or “Responsibility Role” field, ensure that you fill in one or the other. You cannot assign both a user and a user role to the same action list item.
If the window is not still open on your page, navigate back to the same settings menu you clicked on earlier and select import / export data again. This will bring back the same window as before.
This time, click the blue select button to find your file.
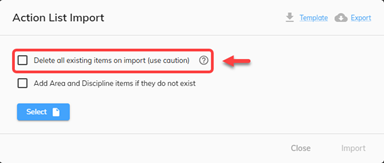
3. Once you have your file selected, determine if one or both check boxes presented apply for you.
a. “Delete all existing items on import” will wipe all existing data from the action list upon import. If you are looking to add to an existing checklist then leave this box empty. The system will merge matching data and add new tasks that are not already present.
b. “Add Area and Discipline items if they do not exist” is a quick and easy way to add groupings to a checklist that may have not already been prior to your upload.
4. Click “Import” to make your checklist available for the team to begin working on.
Every action list is divided into two groups. The group names are dictated at the admin level, but the elements that make up a group can be built out in the project.
There are two ways to add to a group:
Option 1: Directly in the Action List tool.
Click on the More button.
2. In the drop-down, select which group you want to edit.
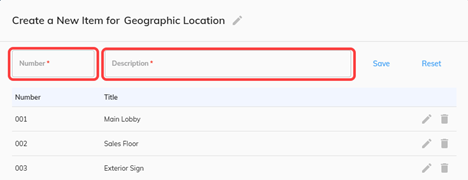
3. To populate the groups, type the number and description into the field available and click Save.
You can also edit existing groups by clicking on the pencil icon. Be sure to hit the Save button when finished.
Option 2: Via Excel Export/Import
Click on the More button located in the top right-hand corner.
Select the option for import/export function for the name of the list.
You can either download a blank excel template or export the template with the current data. Both templates will have the same fields and requirements.
Fill out and save the file where you can easily find it again.
Open that same window and use the blue select button to import your file.
Action List tasks and Schedule tasks can be linked to streamline management of both tools. This will automatically assign due dates to the action list and update the Schedule task’s percent complete as linked items are marked off.
Open the checklist that contains the items that you wish to link.
Select the items that need to be linked. You can select the box at the top left to grab the whole list.
Once items have been selected, options will appear at the top of the list. Click “Link to Schedule”.
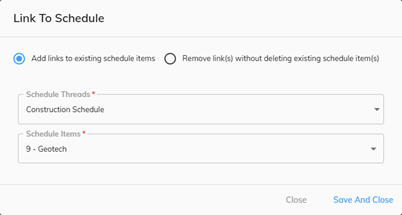
4. A pop up will provide two options:
a. “Add links to existing schedule items”. This does not create new schedule tasks.
b. “Remove link(s) without deleting existing schedule item(s)”.
5. Select which schedule you want to link to from the drop down.
6. Start typing the schedule task name and a list will populate with corresponding options. Select the Schedule item you want to link.
7. Click Save and Close.
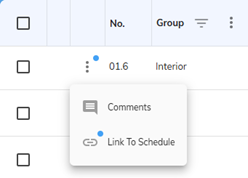
On the log page, you’ll see a blue dot appear within the vertical ellipsis. Clicking this will allow you to view the link between the scheduled tasks.